Journal · Developer story
How a Stitchu pattern is made: the layers under one dress
Every Stitchu pattern comes out of the same chain of layers. Each layer reads the file the one before it wrote, and the last layers write the six files of a pattern: the technical drawing, the pattern overview and four PDFs. This post goes through the chain layer by layer: what each layer does, what it takes in and writes out, one number from the red gingham button-front mini, and which work lane owns it. None of the dresses has been sewn yet.
This is the system view. One dress step by step, with its pictures: From photo to pattern. How the lanes worked together for one day: Why we split Stitchu into four work lanes.
- The chain at a glance
- The reading
- The photo tools
- The pattern graph
- The C++ engine
- The drawing
- The pattern and its sizes
- The package
- The checks
- Which lane owns which layer
- What is still open
The chain at a glance
One request goes through these layers. After the reading, one pipeline runs the photo tools, then builds the pattern, the drawing and the package; the pattern comes before the drawing because the drawing takes some of its seams from the engine.
- The reading: a photo or a description becomes a structured description of the dress.
- The photo tools: what the photo can show is measured and written into the reading.
- The pattern graph: the reading becomes a list of operations on a base garment graph.
- The C++ engine: it applies the operations, checks the result and draws it.
- The drawing: the dress as a technical drawing on a fashion figure.
- The pattern and its sizes: the same graph on a real body, in millimetres.
- The package: the A4 and A0 patterns, the cutting layout and the sewing guide.
- The checks: what is checked automatically, and what that does not prove.
At the end the pipeline hands over six files: the drawing and the pattern overview as SVG, and the A4 pattern, the A0 pattern, the sewing guide and the cutting layout as PDF. It refuses to hand them over if the reading or the engine programs changed while it ran, or if the drawing or the package no longer match the reading.
1. The reading
It turns a photo, a written description or both into a structured reading of the dress: its parts and how they join, lengths and proportions, the neckline, seams, openings, closures and edge finishes, the fabric, and a list of what the input could not show. The reading is checked with the same rule functions the drawing uses. A reading is tried up to three times, and each retry gets the previous errors; if none passes, the closest one is stored with its violations listed, and the later layers refuse to build from it.
- In: a photo, a description, or both.
- Out: one JSON reading per photo and request, kept in a single cache folder. The drawing and the pattern read only this file, and the same input is not read twice.
- Red gingham: eight 22 mm buttons on the centre front, the first 23 mm below the neck edge, with a 22 mm button lap and a 69 mm facing. 18 of its 20 construction choices carry a written reason, and four assumptions are listed, starting with the back, which the photo does not show. For all five free patterns the reading was corrected against the photo or written directly, not taken as the reading step produced it; this one was re-read and its checks counted on 4 October.
- Lane: the reader lane.
2. The photo tools
They measure on the photo what the reading can only estimate, and write the value into the reading with the tool named as its source. A tool that is not sure writes nothing and says why. Three run on every request that has a photo, before the pattern is built: one for the fabric and print colours, one for the neckline’s depth and shape, and one for the armhole and the shoulder position. Others are not in the pipeline yet and are run separately, among them tools that count checks or stripes, find buttons, place the hem against the hanging wrist and measure garment widths row by row. Since 3 October, a value measured on a photo without a tool is turned into a tool in the same round, so the next dress gets it too.
- In: the photo and its reading.
- Out: measured fields in the reading, each with its source.
- Red gingham: the check counter found 24.2 checks across the bust row; before that, the drawing showed 31 where the photo has 24. Read against the hanging wrist, the hem falls 460 mm below the waist; a scale taken from the torso had given 554 mm. The reading still marks the 460 mm as not verified, because the size of the checks was not measured on its own.
- Lane: the three automatic tools sit with the drawing code, which belongs to the engine lane. Apart from one that also sits with the drawing code, the separately run tools had no lane on 17 October; most of them were written between 3 and 8 October, when one dress was worked on at a time.
3. The pattern graph
The garment is described as a graph, under a written contract. A panel is a closed ring of edges. A seam joins two chains of edges with a length rule: one side is a ratio times the other plus an ease, so gathering is a ratio above 1 rather than a separate feature. Points are given as body landmarks and proportions, not millimetres, so one graph can be evaluated on any body. The pattern compiler turns the reading into a list of operations on a frozen base graph with a front and back bodice, a front and back skirt and a sleeve. The operations are geometry (reshape an edge, split or merge panels, flare, shape a dart, set a closure, add a mark) and carry no garment names; each one changes only the panels it names.
- In: the reading.
- Out: an operation list and, once the engine has applied it, the garment graph.
- Red gingham: in the repository today, its reading compiles to 75 operations, among them 25 edge reshapes, 16 marks and 2 merges that join bodice and skirt, because the dress has no waist seam. The resulting graph has 4 panels and 7 seams.
- Lane: the engine lane, which owns the pattern compiler and the graph contract.
4. The C++ engine
The pattern’s geometry is computed here. Three programs work on the graph: the first applies the operations to the base graph for a given body, the validator checks whether the result can be sewn and measures the finished garment, and the third draws it as SVG: the drawing, the cutting pattern or the sewn construction. The validator compares the two sides of every seam, matches notches, looks for outlines that cross themselves and checks that every ring of seams closes; with one red verdict, no package is written. The base graph’s notes name where its ease comes from (Aldrich, Threads magazine and ready-to-wear measurements; the sleeve’s from FreeSewing’s Brian block) and list the values that are assumed.
The same C++ is built twice: natively with CMake for the command line, and as WebAssembly for the browser, a single script of about 5 MB. A test applies the operation list of every dress in the repository once in WebAssembly and once with the native program, and requires the two graphs to match in every operation and geometry record; only the note naming the program may differ.
- In: the base graph, the operation list and a body.
- Out: the solved graph, the validator’s report with the finished measurements, and SVG.
- Red gingham: in EU36 the validator measures a finished bust of 900 mm, a hip of 950 mm and a hem 1112 mm round.
- Lane: the engine lane, which owns the engine source and the WebAssembly file. Root, the integrator, builds the native programs on the integration branch.
5. The drawing
It draws the dress as a technical drawing, front and back, on a fashion figure. The figure is one fixed, idealised EU36 croquis, as in fashion drawings, so every dress is drawn at the same scale; only the pattern uses real bodies. For 12 of the 20 dresses in the repository, the red gingham among them, the seams in the drawing come from the engine’s solved pieces, so the pattern has to be built before the drawing. The same drawing code runs on the command line and in the browser.
- In: the reading and, for those 12 dresses, the engine’s solved construction.
- Out: the technical drawing, as SVG.
- Red gingham: on the figure the skirt looks longer than it is. The drawing’s own note says that on the EU36 body the skirt is 460 mm from the waist and ends 120 mm above the knee.
- Lane: the engine lane.
6. The pattern and its sizes
The same graph is evaluated on a real body and written at true scale, in millimetres, with cutting and stitching lines, notches, grainlines, fold marks and cut counts. The bodies are defined in a body contract: the EU36 body of the free patterns (bust 84, waist 66, hip 90 cm, from burda style’s women’s size table) and a series from EU34 to EU44. Every size has the same landmarks; its girths and lengths come from the size table, and a few unverified values are carried over from EU36. There is no fixed “add 4 cm per size” rule. Because the graph stores landmarks and proportions, another size is the same graph on another body.
- In: the graph and a body.
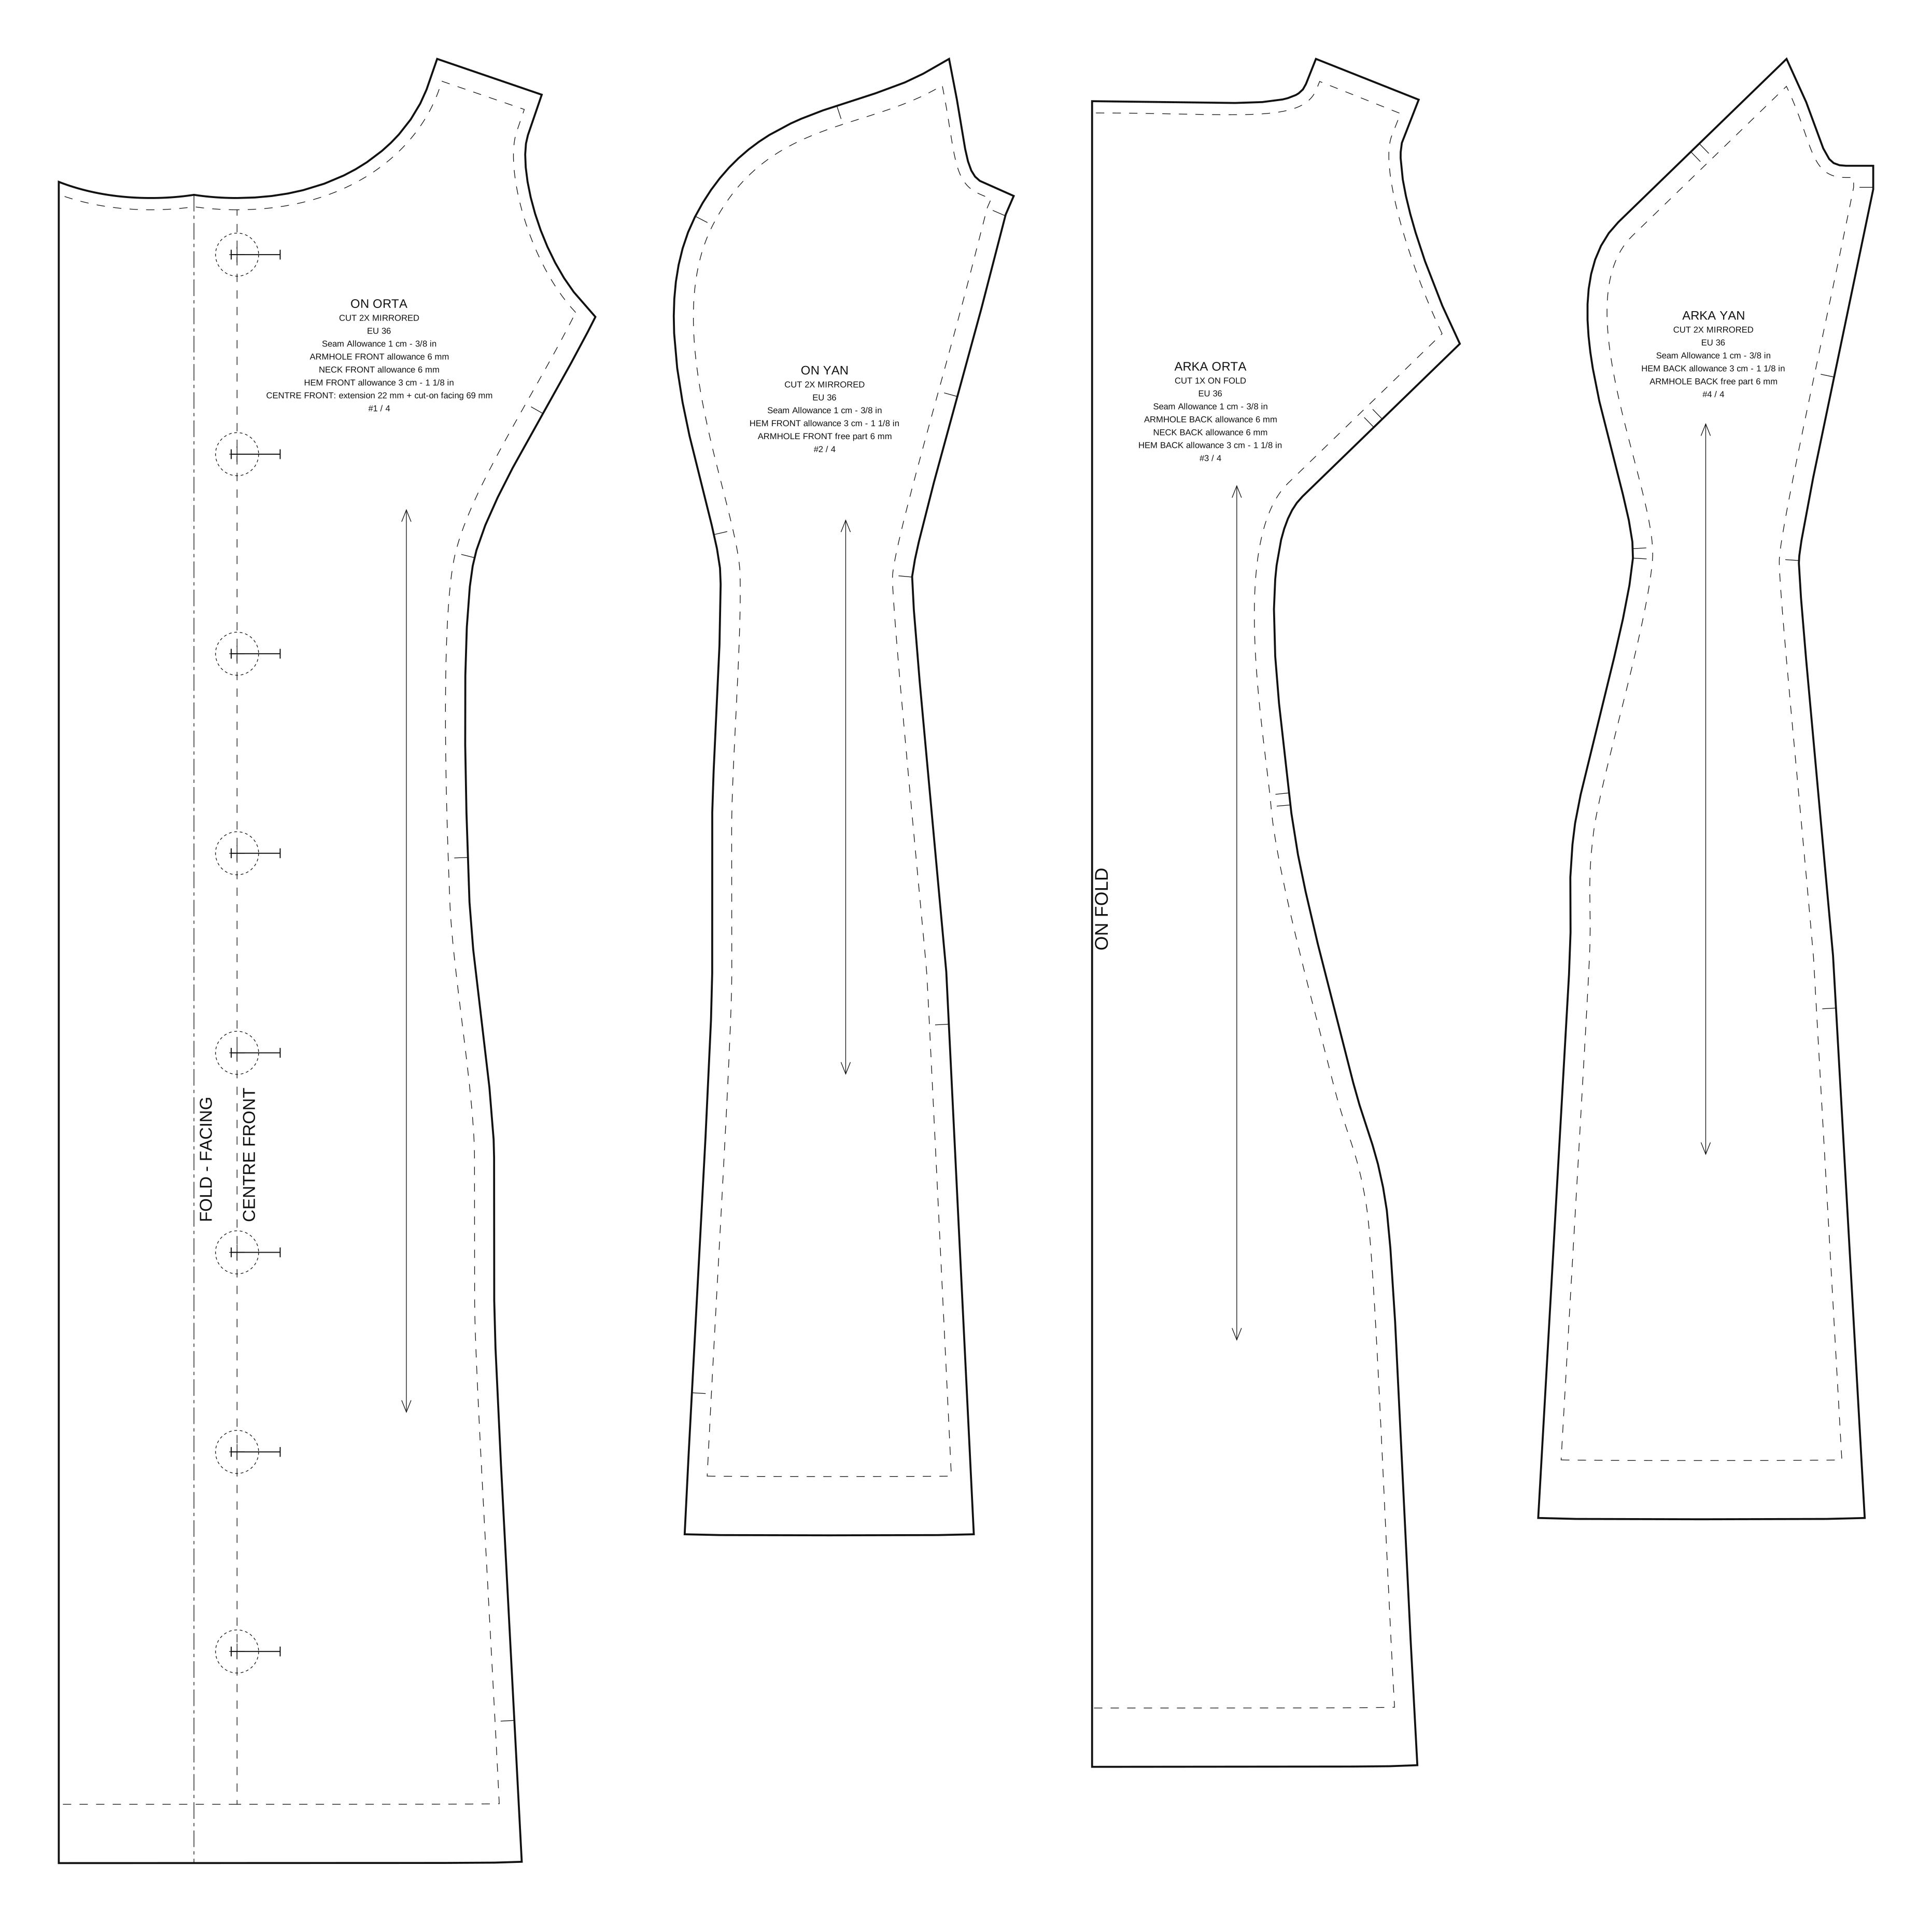
- Out: the cutting pattern as SVG, which the package prints.
- Red gingham: four pieces: front centre and front side, each cut twice; back centre, cut once on the fold; back side, cut twice. On 10 October the pattern was built in the browser in EU34 to EU44 and the sewability check reported no errors; only EU36 is offered as a download.
- Lane: the engine lane. Rebuilding a saved design in another size in the browser, from its saved reading, is the web lane’s work.
7. The package
It puts the pattern on paper and writes the instructions. The packer does not touch geometry: every millimetre it prints is one the engine computed, so a wrong pattern prints wrong instead of being quietly fixed. The sewing order comes from the stitch graph: seams that join separate parts come first, and the seam that closes a ring into a tube comes last, as in flat construction. The guide’s sentences are written in code and filled in with this pattern’s numbers: finished measurements, seam lengths and notch positions. The same code makes the PDFs on the command line and in the browser.
- In: the cutting pattern, the graph, the reading and the validator’s measurements.
- Out: four PDFs: the pattern tiled on A4 with overlaps, register marks and a 100 mm test square; the same pattern on A0 for a copy shop; a cutting layout for 115 and 150 cm wide fabric; and the sewing guide.
- Red gingham: A4 pattern 23 pages, A0 two sheets, sewing guide 6 pages, cutting layout 1 page, with 1.69 m of 115 cm fabric. The guide gives body against finished garment: bust 84 / 90 cm, waist 66 / 68.5 cm, hip 90 / 95 cm.
- Lane: the engine lane (the PDF and guide code); Root’s pipeline calls it last.
8. The checks
What the code checks: the reading rules; the validator, without which no package is written; a seal on every package with the content hashes of the files it was made from (pattern, graph, reading, construction) and of the packer’s own code, so a package left behind by any change is reported stale and rebuilt or refused; the pipeline’s last step, which checks that the drawing still matches the reading; and the engine’s test suite, run locally, which also compares the site’s engine with the native one. When engine files change, a pre-commit hook and the CI run a list of negative gates.
What they do not prove: that the dress fits, how the fabric behaves, or that the drawing is faithful to the photo. Zero red verdicts from the validator also do not catch a change of shape. A green check is a statement about geometry, not a fitting, and no dress has been sewn. Several problems got past green checks and were found by a separate review or by reading the real output; the four-lanes story lists seven.
- Red gingham: in the repository, its package seal records a validator run on 17 October with 0 red verdicts. Its pattern also went through nine digital reviews of the real files; the first eight sent it back.
- Lane: each lane runs the tests for its own files; Root reruns them after every merge.
Which lane owns which layer
In the run of 17 October the work was split by files, with one writer per file. For these layers that meant:
- Reader lane: the reading.
- Engine lane: the three automatic photo tools, the graph contract, the pattern compiler, the C++ engine and its WebAssembly file, the drawing, and the PDF and guide code.
- Root, the integrator: the pipeline that runs the layers in order, the local bridge between the site and the chain, the native build and the integration tests.
- Web lane: the workshop and wardrobe pages, which run the engine, drawing and PDF code in the browser.
- No lane on 17 October: most of the separately run measuring tools, the stand-alone gates and the command-line packer.
A layer and the page that runs it in the browser can belong to different lanes; they meet at Root’s merges.
What is still open
- No dress has been sewn or fitted. The five free EU36 patterns are digital samples; sew a toile before you cut your fabric.
- The readings of the five free patterns were corrected against the photo or written directly. A reading that is right as the reading step produces it is still open.
- Only EU36 is offered as a download of the free patterns, although the engine drafts every size from EU34 to EU44.
- The workshop on this site builds one example design in your browser. It does not read your own photo or description yet.
Related: one dress from photo to PDF · the four work lanes · make a toile